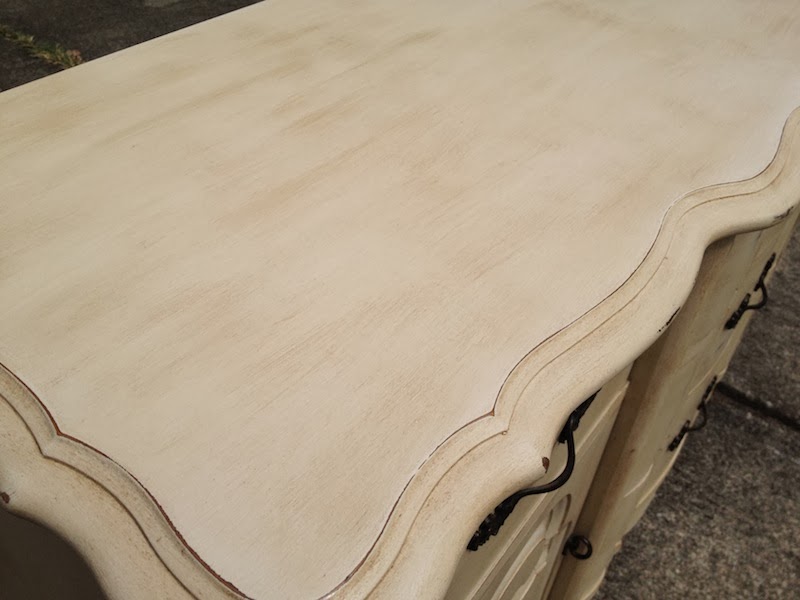
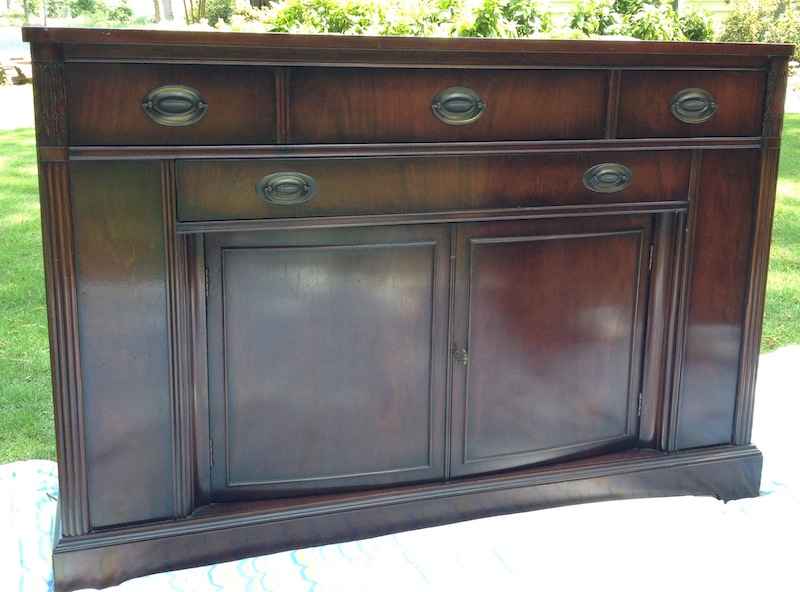
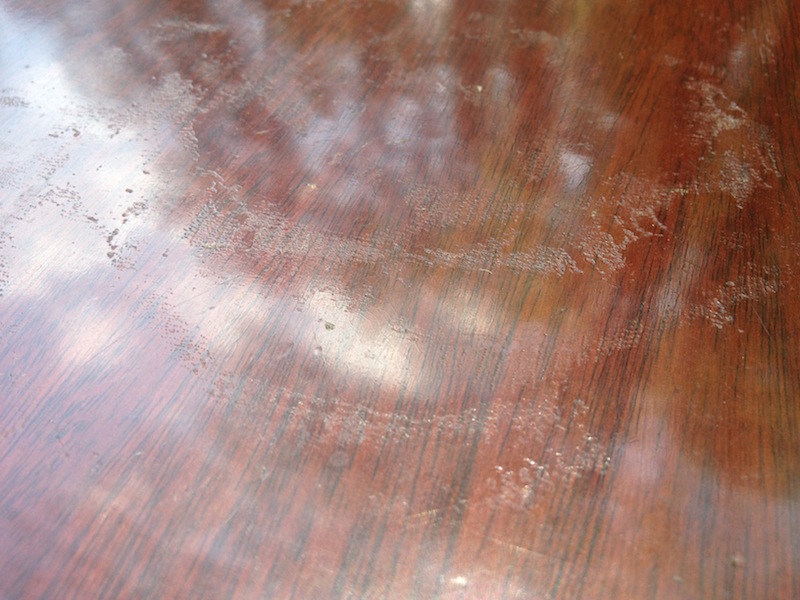
My mom scored this beautiful desk at an estate sale. The drawers were full of papers from the 70's and the wood on top wasn't in the best condition. With alittle paint and some elbow grease to refinish the top...this curvy lady turned into a beauty! One of my favorites--unique and pretty. [and I'm not a "pretty" kind of person!]
Sunday, February 2, 2014
More French Provincial
French Provincial Makeover
How about this for a facelift? I absolutely love the finished product! A solid piece with tons of storage, that could be used for a dresser, buffet or media console. Check out the details up-close.
This piece is currently available in my booth at Kelly & Company Antiques in Fayetteville, GA for $550.
Friday, January 24, 2014
Unique Beer Garden Table & Benches
Every once in awhile, I come across a unique piece. They are unique for different reasons, but this was a one-of-a-kind piece to me. My client came across this Beer Garden Table Set at Scott's Antique Market here in Atlanta. They thought it would be the perfect solution for the "kid table" at family get-togethers. And with the folding legs, it can be put away for easy storage. The client only wanted me to sand down the rough edges and then seal the whole thing with polyurethane. The orange paint was in great, rustic condition, and we wanted that to stay! Needless to say, this project was an easy fix!
![]() |
| [Stamps on benches & tables] |
| [Great distressing] |
| [Unique folding legs] |
Girls Will Be Girls
A client wanted to update their girl's dresser. The plan for the new look was pink...girly pink! The inspiration for the color was this:
The inspiration for the girl's bedroom in their new [farm] house was this:
Upon further inspection, the blue dresser had a few previous lives--yellow, pink and white. And we wanted to keep the crystal knobs. The chosen color was Sherwin Williams Impatient Pink (SW6854).
Here's the sparkly outcome, while she waited on the front porch to get picked up and taken to her new home! I can't wait to see the whole room put together!
![]() |
| [Source] |
![]() |
| [Source Unknown] |
Upon further inspection, the blue dresser had a few previous lives--yellow, pink and white. And we wanted to keep the crystal knobs. The chosen color was Sherwin Williams Impatient Pink (SW6854).
Here's the sparkly outcome, while she waited on the front porch to get picked up and taken to her new home! I can't wait to see the whole room put together!
Custom Outdoor Furniture
I haven't blogged in awhile because I've been pretty busy with my other little project. I honestly haven't painted anything in probably 2 months! But I was busy during the Fall doing some custom pieces, so that's what I want to share with you.
I did a few pieces of outdoor furniture, which I really enjoyed refinishing. It was my first time using outdoor polyurethane, so just to be sure, I did 3-4 coats of poly. The great thing about the outdoor poly is that it protects from sun damage, and also expands and contracts with the temperature.
Every good Southern home has a front porch with a rocking chair or porch swing. This custom order included both! The inspiration for the 'look' was the client's bannister in their house.
The swing was crafted by the client, but was still raw wood. The rocking chair joined the family over 20 years ago in Guam, and was used to rock their babies way back in the day. By distressing the rocking chair, I discovered all of her previous colors--red, gray, white and natural wood-- but she's black now! They both go perfectly on the porch, in front of the home's black shutters.
I did a few pieces of outdoor furniture, which I really enjoyed refinishing. It was my first time using outdoor polyurethane, so just to be sure, I did 3-4 coats of poly. The great thing about the outdoor poly is that it protects from sun damage, and also expands and contracts with the temperature.
Every good Southern home has a front porch with a rocking chair or porch swing. This custom order included both! The inspiration for the 'look' was the client's bannister in their house.
The swing was crafted by the client, but was still raw wood. The rocking chair joined the family over 20 years ago in Guam, and was used to rock their babies way back in the day. By distressing the rocking chair, I discovered all of her previous colors--red, gray, white and natural wood-- but she's black now! They both go perfectly on the porch, in front of the home's black shutters.
| Top: Before Bottom: After |
Friday, September 13, 2013
World's Longest Yard Sale!
The World's Longest Yard Sale has been on my bucket list for years! I've dreamed of fields in the middle of no where full of beautiful junk! I wasn't about to let the sale come and go this year. I roped my mom into coming on the adventure with me, which wasn't difficult because she's normally my partner in junkin' crime. We borrowed my brother-in-law's pickup truck and headed north! We went straight to Signal Mountain, TN--which is where I was told, "you could spend all day on the mountain!"
Our very first stop was at Signal Mountain Presbyterian Church, and almost immediately I was in a 'to buy or not to buy' debate. Without knowing what the day would hold, I wasn't totally sold on a beautiful antique spool turned headboard and footboard. But, after deciding it was unique, I went for it! My first purchase of the day was done!
We continued to head north on Highway 127. You could literally spend days on the mountain because there are sale signs leading you off on side streets; sometimes leading to the pot of gold at the end of the rainbow, and other times leading you on a wild goose chase. After a few goose chases, we decided to only stay on Highway 127!
Somewhere we hit traffic, but we also hit those dreamt about fields! You could park on the side of the road and walk around and between big open spaces full of treasures. Without a real plan or destination, we stayed on Highway 127 until the sun was setting and the sales were getting more sparse. We ended up in Dunlap, TN and headed towards the main roads to head back home.
The next morning, my mom woke me up and proclaimed, "I think we should go back to Chattanooga today and head south towards Gadsden!" I couldn't say no, so off to Chattanooga we went! Granted, the weather wasn't as good, and it was the last official day of the sale, but we didn't like this route! First of all, it took forever to find the right road, and then the sales were very scarce. I will say it was a beautiful drive though! By the time we made it to Gadsden, it was nearly dark, and the sidewalks were rolled up, so I have no idea how 'good' things would be in Gadsden. Next time I will defiantly just head to Signal Mountain again!
Here are a few of my other picks:
Awesome gas cans and an antique wood plane on the left. The red can was my favorite purchase of the weekend--perfect color and perfect patina!
Hand-stitched linens. The birdcage table runner was my second favorite pick. Still trying to talk myself out of keeping it for myself!
Ugly ugly art--will repurpose the good wood frames!
Deal of the day: $1! Don't worry...I'm only using the frame!
Friday, May 31, 2013
Blue Buffet (aka The Blue Beast)
| Before: Brown Beast |
| After: Blue Beast |
I decided to keep the original hardware, which works perfectly with the dark wax.
The buffet is very classic, but the blue color just makes it FUN! It would be a great addition to any dining room, but I think it'd also look pretty fantastic as a bathroom vanity or a display piece in an entryway or living/family room. It's just a cozy piece....not too fancy and relaxing.
I'm not sure if I've gotten the need for blue out of my system totally, but The Blue Beast was a pretty good start!
For Sale: $525
Measurements
Height: 35.5"
Width: 51.5"
Depth: 19.5"
Measurements
Height: 35.5"
Width: 51.5"
Depth: 19.5"
Tuesday, May 7, 2013
Chippy Paint Experiment
I am a huge fan of the chippy paint look. Whether it's old, weathered and naturally chipping, or it's made to look that way, I love the rustic look. I have seen tutorials for making your own chippy look, so I thought I'd give it a try.
I didn't want to experiment on something with alot of surface area, so I decided that a mirror would be my laboratory. I had picked up a mahogany mirror at an auction and knew I wanted to make it a fun color. So began the turquoise chippy mirror experiment!
I should note that this experiment began after 10pm, so I was taking the quick and easy route. I decided to try the Elmer's glue technique. Because this was a late-night, first attempt, I did not adequately document with photos. I did another small experiment after the mirror, and that was fully documented, so I will post that one too!
I began by taping off the mirror.
Then I used craft paint (you know, the 59 cent kind) to paint the frame black. You can always leave the wood, or choose a different color. This base color will the what shows through the chippy-ness.
I wasn't really sure how much glue to use, so I just began squeezing out glue squiggles on the biggest flat surface of the frame. According to other tutorials, you squeeze the glue on, spread it with a foam brush and let it set for a minute or two, and then put your paint over that. Well, after I spread the glue and brushed on the color, I quickly realized that I had put on too much glue! It was a watery mess.
This time went much better! And because I wanted to speed up the process, I grabbed my hair dryer to make the paint dry more quickly. As soon as the hair dryer hit it, the crackling began!
After some playing around, I learned that when you apply the paint, if you only use one brushstroke to spread the paint in an area, the chippy effect turns out better. I guess there's less disturbance of the glue underneath? Also, use very light pressure and gentle strokes.
Once you get the hang of it, the process goes very quickly. The longest part is waiting for the glue and paint to dry, so that's why I recommend the hair dryer...or if you're fancy, a heat gun.
I didn't want to experiment on something with alot of surface area, so I decided that a mirror would be my laboratory. I had picked up a mahogany mirror at an auction and knew I wanted to make it a fun color. So began the turquoise chippy mirror experiment!
I should note that this experiment began after 10pm, so I was taking the quick and easy route. I decided to try the Elmer's glue technique. Because this was a late-night, first attempt, I did not adequately document with photos. I did another small experiment after the mirror, and that was fully documented, so I will post that one too!
I began by taping off the mirror.
Then I used craft paint (you know, the 59 cent kind) to paint the frame black. You can always leave the wood, or choose a different color. This base color will the what shows through the chippy-ness.
I wasn't really sure how much glue to use, so I just began squeezing out glue squiggles on the biggest flat surface of the frame. According to other tutorials, you squeeze the glue on, spread it with a foam brush and let it set for a minute or two, and then put your paint over that. Well, after I spread the glue and brushed on the color, I quickly realized that I had put on too much glue! It was a watery mess.
| Watery.
I let it dry some more and then scraped it all off. I cleaned up the experiment area and then started again with less glue on the other side of the frame.
|
| Scrape. |
| Wiped clean. |
![]() |
| Paint applied gently. |
| Chippy-ness begins! |
Once you get the hang of it, the process goes very quickly. The longest part is waiting for the glue and paint to dry, so that's why I recommend the hair dryer...or if you're fancy, a heat gun.
| A close-up of the chippy look.
After the paint dried, I applied two coats of finishing paste and gave it a good buff. Then Miss Chippy took alittle ride and ended up in my booth!
|
Subscribe to:
Posts (Atom)